Wednesday, March 1, 2017

Interceptor: another 10-Liner BASIC Game

My second entry to the 2017 10-Liner BASIC Game competition is an homage to Interceptor developed by Tomohiro Nishikado (of Space Invaders fame) and produced by Taito in 1976. I first learned of Interceptor while researching the games listed in the Chronology from the Ernst Cline novel Armada. I was fascinated to learn Interceptor is almost lost to time. There might be a couple machines still floating around, but no one has yet to capture the schematics needed for MAME emulation. In the original Interceptor, you are flying a fighter aircraft chasing down enemy planes. The planes appear to come in singles or pairs and can move in depth as well as x-y coordinates. You use the joystick to move them into your targeting retical and fire. The original machine uses a blue-and-white display with a plastic overlay for the cockpit framing. I hope to capture this look in the BASIC version, although the planes come in singles and there's no animation for the projectiles. Find it over on GitHub.

If you've ever played the original Interceptor arcade game, please leave a comment below about your experience.


Usually when I write these BASIC games, I save the detailed graphics for last. I start with just blocks for the sprites and don't spend too much time initially on the appearance. Rather, I try to nail down the game logic first, then polish it up. This time, I did it backwards. The look was most important to get right first; then, the logic would fit in the rest of the allowed code space. This turned out to be a challenge - at one point 6 lines were dedicated to set up, which is too much. I finally got the setup (screen drawing, sprite definition, initialization, etc.) down to four lines in the final version.


From an online video, it appears the game is the familiar blue and white motif of Atari's graphics 0 and 8 modes where pixels are one television scan line tall and one-half color clock wide. The plastic overlay is a darker blue or black color. The timer and score are displayed in large text at the bottom with a dark blue background. So in my version, I wanted three colors: light blue field, dark blue border, and white sprites and text. This led me to choose graphics mode 7, which is half the resolution (two scan lines by one color clock). I tried graphics 15, which has one-scan-line vertical resolution and is available on the 800XL, early on but concluded the extra resolution didn't add to the visual quality of my limited version. I also use double-line double-wide player sprites, which match the graphics 7 resolution. Only using half the vertical resolution in graphics 7 vs. 15 also saved on characters and commands in the code.

To simplify the game, all the enemy planes fly solo with no wingmen There are up to 3 planes on the screen at one time, one each flying left, right and vertical. This uses three of the four sprites. The fourth player is an explosion graphic that is switched in when you score a hit. To create the explosion, I took a technique from Yars Revenge to create a random pattern without storing the data: point to a location in memory that already has data (e.g., into the code itself). I point to location 95 for 17 bytes that contain a bunch of OS registers. (This technique is described in the great book Racing the Beam about the Atari VCS platform.) The biggest sacrifice made, due to both line count and speed limitations of BASIC, is the drawing of the projectiles. In the original, these are rapidly moving small lines. In mine they are solid lines. I tried some animation, but it took up too much code space. There might be some optimization that can be done, but I feel it works. After all, the BASIC version is humble nod to the original.




Monday, February 13, 2017

SPLATARI - 2017 BASIC 10-Liners Game Competition Entry #1

It's that time of year: there are games to be written instead of doing taxes! My first entry for this year's competition is a take off on Splatoon for the Wii U that I call SPLATARI. It is written in TurboBASIC XL using the TBXL-parser to run on an  Atari 800 XL emulated by Altirra. To grab it, head on over to it's GitHub page or download the ATR file directly. Just boot the ATR on Altirra in NTSC mode - the game will autorun.


Directions

SPLATARI requires two joysticks to play. Move your squid around the screen and splat ink by pressing fire. You have 180 seconds to beat your opponent by inking more of the screen than them. Run out of ink? Swim or rest in your own color. But be careful! You lose health when you swim through your opponent's ink color. Lose all your health and you get sent back to your wall. If you and your opponent collide, you both get knocked back to your respective walls. There's no time to rest because you don't know the score until the time runs out and the counting is done. Press fire to play it again.
Splat ink around the playfield with your squid.
Cover more area than you opponent to win.
Watch your health and ink levels!

Design

The original Splatoon is a first person shooter. One of the Boy's favorite game modes is team vs. team. I took that idea to make this top down version two players. I considered making a single player version, but there's no room left in the 10 lines! The two player version is more fun I think. There's lots of opportunity for trash talking your opponent. The Boy was instrumental in making this game work. He suggested two key features: running out of ink and filling up in your own color; and losing health in your opponent's color. I think those are in the original and they really make the game work. It would be boring without them. The Girl designed the pixel graphic for the player. It's a squid like in the original game. Squid ink. Took me a while to get that.

Code

Well, it's written in BASIC. It fits in 10 lines with lots of abbreviations. Thanks to the TBXL-parser, it wasn't too difficult to optimize in length. It gets tricky at the end of writing, especially when changing a 4-digit number to a 5-digit number (for the colors of the players/sprites) ripples through and knocks half of line 10 onto line 11. Ack! Fortunately, reordering some statements on the first two lines brought it back in spec.

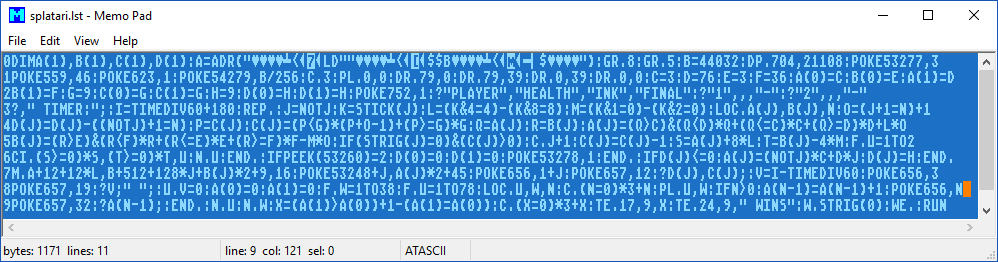
Here's the obfuscated 10 lines in ATASCII:

There's a new requirement this year to provide a version with one-statement-per-line. I suppose that makes things much easier to interpret. My program is 157 lines including white space and comments:
'-----------------------------------------------------------
'
'     SPLATARI
'
'Simplistic Splatoon for Atari 800XL 8-Bit BASIC 10-Liner
'Two-player game with joysticks
'
'Jeff Piepmeier
'February 12, 2017
'http://jeffpiepmeier.blogspot.com/splatari
'http://github.com/jeffpiep/splatari
'
'Parsed with TurboBASIC XL Parser Tool 
'http://github.com/dmsc/tbxl-parser
$options +optimize, optimize=-convert_percent-const_replace
'
'-----------------------------------------------------------

'SET UP MEMORY
DIM X(1),Y(1),INK(1),HEALTH(1)
PLAYER=ADR("\00\00\00\00\18\3C\7E\B7\7E\4C\44\22\00\00\00\00\18\3C\7E\DB\7E\24\24\42\00\00\00\00\18\3C\7E\ED\7E\12\16\24\00\00\00\00")

'SET UP DISPLAY
GR.8:REM CLEAR OUT 8 KBYTES
GR.5:REM USE 80 X 40 PIXELS, 4 COLORS, 4 LINES OF TEXT

'SET UP SPRITES
PM=$AC00:REM THIS SHOULD BE CLEARED OUT BY THE GR.8:GR.5 TRICK
DPOKE 704,$5274:REM COLOR OF PLAYER 1 & 0      
POKE 53277,3:REM ENABLE PM DISPLAY
POKE 559,46:REM ENABLE PM DMA WITH 2-LINE RES
POKE 623,1:REM SET PLAYER PRIORITY OVER PLAYFIELD
POKE 54279,PM/256:REM TELL ANTIC WHERE PM RAM IS

'DRAW A BOX AROUND PLAYFIELD  
C.3
PLOT0,0
DRAWTO79,0
DRAWTO79,39
DRAWTO0,39
DRAWTO0,0

'SET UP LOCATIONS, INK AND HEALTH FILLS
MINX=3
MAXX=76
MINY=3
MAXY=36:REM LIMITS OF PLAYFIELD
X(0)=MINX
Y(0)=MINY:REM LOCATION OF PLAYER 1
X(1)=MAXX
Y(1)=MAXY:REM LOCATION OF PLAYER 2
MAXINK=9:REM FULL INK AMOUNT
INK(0)=MAXINK
INK(1)=MAXINK
MAXHEALTH=9:REM FULL HEALTH AMOUNT
HEALTH(0)=MAXHEALTH
HEALTH(1)=MAXHEALTH

'INITIALIZE SCOREBOX
POKE 752,1:REM TURN OF CURSOR
?"PLAYER","HEALTH","INK","FINAL"
?"1",,,"-"
?"2",,,"-"
?," TIMER:";

'START THE GAME TIMER FOR 180 SECOND GAME
BASETIME=TIME DIV 60 + 180

'GAME LOOP
REPEAT
P=NOT P:REM ALTERNATE PLAYER PROCESSING EVERY PASS OF LOOP

'PROCESS JOYSTICK INPUT
S=STICK(P)
LR=(S&4=4)-(S&8=8)
UD=(S&1=0)-(S&2=0):REM   CREATE +/1 VALUES FOR LEFT/RIGHT AND UP/DOWN 

'FIND THE COLOR YOU ARE SITTING IN AND TAKE ACTION
LOC.X(P),Y(P),PC
SPEED=(1+(PC=P+1)):REM GO FASTER IF YOU ARE IN YOUR OWN INK
HEALTH(P)=HEALTH(P)-(PC=(NOT P)+1):REM LOSE HEALTH IF YOU ARE IN OTHER INK
INK=INK(P)
INK(P)=(INK<MAXINK)*(INK+SPEED-1)+MAXINK*(INK>=MAXINK):REM GET INK IF IN YOUR OWN COLOR

'MOVE THE PLAYER
U=X(P)
V=Y(P):REM USE FEWER SPACES IN LINE BY COPYING VARIABLE OVER
X(P)=U*((U>MINX)&(U<MAXX))+MINX*(U<=MINX)+MAXX*(U>=MAXX)+LR*SPEED:REM LIMIT X MOVEMENT AND MOVE LEFT/RIGHT
Y(P)=V*((V>MINY)&(V<MAXY))+MINY*(V<=MINY)+MAXY*(V>=MAXY)-UD*SPEED:REM LIMIT Y AND MOVE UP/DOWN - AXIS FLIPPED

'SPLATTER INK
IF (STRIG(P)=0)&(INK(P)>0)
 C.P+1:REM SET COLOR
 INK(P)=INK(P)-1:REM USE UP SOME INK
 SPLATX=X(P)+8*LR:REM SPLATTER AHEAD OF PLAYER DIRECTION
 SPLATY=Y(P)-4*UD
 FOR I=1 TO 2:REM CREATE SPLAT
  CIRCLE SPLATX*(SPLATX>=0),SPLATY*(SPLATY>=0),I
 NEXT I
ENDIF

'IF AT ZERO HEALTH, GET KNOCKED BACK TO YOUR SIDE
IF PEEK(53260)=2
 HEALTH(0)=0
 HEALTH(1)=0
 POKE 53278,1:REM CLEAR THE COLLISION REGISTER
ENDIF
IF HEALTH(P)<=0
 X(P)=MINX*(NOT P)+MAXX*P
 HEALTH(P)=MAXHEALTH
ENDIF

'UPDATE POSITION OF SPRITES
MOVE PLAYER+12+12*LR,PM+$200+$80*P+Y(P)*2+9,16:REM SET THE Y POSITION BY MOVING PLAYER
POKE $D000+P,X(P)*2+45: REM SET THE X POSITION OF THE PLAYER

'UPDATE SCOREBOX
POKE 656,1+P:REM SET LINE NUMBER BASED ON PLAYER NUMBER
POKE 657,12
?HEALTH(P),INK(P);

'UPDATE GAME TIMER
XTIME=BASETIME-(TIME DIV 60)
POKE 656,3
POKE 657,19
?XTIME;" ";

'KEEP PLAYING UNTIL OUT OF TIME
UNTIL XTIME=0

'FIGURE OUT SCORE
X(0)=0
X(1)=0:REM INITIALIZE SOME COUNTERS. REUSE X POSITION BECAUSE NO LONGER NEED IT
FOR J=1 TO 38
 FOR I=1 TO 78
  LOC.I,J,PC:REM GET COLOR OF PIXEL
  C.PC+3*(PC=0):REM CHANGE TO A DIFFERENT COLOR TO FILL UP SCREEN
  PLOT I,J:REM FILL IN PIXEL WITH NEW COLOR
  IF PC>0:REM IF NOT BACKGROUND, INCREMENT SCORE
   X(PC-1)=X(PC-1)+1
   POKE 656,PC:REM UPDATE SCORE IN SCOREBOX
   POKE 657,32
   ?X(PC-1);
  ENDIF
 N.I
N.J

'FIGURE OUT THE WINNER
WINNER=(X(1)>X(0))+1-(X(1)=X(0))
C.WINNER+3*(WINNER=0)
TEXT 17,9,WINNER
TEXT 24,9," WINS"

'ALL DONE - WAIT FOR FIRE BUTTON TO RESTART
WHILE STRIG(0)
WEND
RUN
I hope you give it a try! Leave me a comment if you do and let me know what you think. Thanks for reading.

Friday, December 23, 2016

3D Christmas 2016 - The Print

The model described in my last post was printed and nickel plated by my friend who suggested the idea for the ornament. He also asked me to put a 3/4" hole in the bottom - this makes it possible to rest the ornament on a tree branch with a tree light poking inside. Here's the final outcome:
Merry Christmas from our house to your's!

Sunday, December 11, 2016

3D Christmas 2016 - The Model

This year's Christmas ornament is a 3D model of our house. My 3D-printing friend at church suggested the idea and offered to print and plate it. That's cool. In this post I describe creating this 3D model in SketchUp. I put up an OBJ file over at Thingiverse.

I've used SketchUp occasionally for several years and decided to start there because it's easy to enter accurate dimensions. I stumbled upon the match photo feature, which is exactly what I needed but didn't know it. This feature allowed me to import photos of my house and match the coordinate system to the picture by determining the origin, rotation, scale, and perspective. I followed the directions here. Then I traced the outline with the line tool starting with major lines on the principal axes. I drew some construction lines to allow me to locate the apex and trace the A-frame of the roof. I simplified the overhang because the print will be quite small. I'm not going for accurate construction drawings here, just something that looks nice and representative. This picture shows my starting photo with the nearly finished model:
I used the long gutter and siding seams to align the vanishing point lines, which set the coordinate system perspective and rotation. The origin is moved to the far corner of the garage because it seemed easy to put there. Once the model is started, more photos of the other corners are brought in. For each photo, I set the vanishing lines, origin, and then the scale to visually match up the existing model with the photo as best I can. Here's the other front corner:
I drew the chimney after completing all four sides of the house. The windows and doors are last. Since it's not possible to print detailed lattices in the windows because they are too small, I was advised to put in what I could with about an 0.8mm thickness. The windows are recessed and the shutters are extruded out. I did end up putting the panel details on the garage doors. I don't include any of the utility features, for example the power meter or chimney cover used for keeping the critters out. 

Finally, I usually use Solid Inspector in SketchUp to fix it, but always have to run my models through this cloud repair tool. I stumbled upon Windows 10's new 3D Builder - it did a great job of making the model manifold. 

Saturday, November 5, 2016

Calculator Games

Last year over Tvacation, my nephew was grounded from his XBox. I broke out my girl's TI 84-Plus CSE calculator and learned TI Calculator BASIC. Reminded me of my Tandy PC-4 pocket computer that I programmed in BASIC to multiply matrices (Algebra II homework). I wrote four games worth mentioning:

  1. BOUNCE - a single player Pong/Breakout type game
  2. INVADERS - a Space Invaders variant
  3. SCROLL - a driving game (it scrolls vertically, thus the name)
  4. SNAKE - eat Pi's to grow, but don't run into yourself
The BASIC listings and upload files are over on GitHub. I guess the old adage "any port in a storm" goes without saying - the nephew ate these up for lack of his fancy 3D FPS. 

Here's a game play video of all four programs.


Notes

Bounce

The BOUNCE game is pretty basic. The ball only moves at 45 degree angles, and the angle is determined by where it is bounced off the paddle. Thus, it's possible to get it in an infinite loop and to rack up the score. The primary reason to write this game was training in TI Calculator BASIC.

Invaders

This is a fun one - a single row of space aliens animated by alternating "M" and "W" characters. There's no way in BASIC to look at the screen memory, so I had to keep track of the aliens in an array.

Scroll

Unimaginative name. I wrote the beginnings of a game like this in 6th grade on an Atari 400, but didn't understand enough to add the car logic. In this version, it took a little experimentation, but decided to only do collision detection on the nose of the car. Again, I had to keep track of the location of the track in an array. TI Calculator BASIC has list data types convenient for that.

Snake

The list datatype was extremely important for this game. In fact, I think it made it easy to program because the list length can grow just as the snake grows. There are two lists used to keep track of the row and column locations of each segment of the snake. When the snake head eats a PI symbol, one segment is added to the snake. Without lists, one would need to preallocate arrays and keep track of the tail. Maybe not that big of a deal, but there's a certain elegance in the TI Calculator BASIC solution.

Monday, October 31, 2016

Pumpkin Pi

Pumpkin with PI symbol and Arduino-controlled Neopixel LEDs


Neopixels are individually addressable RGB LEDs. I bought an 8x1 array to try them out and decided they would make a good pumpkin light. Add an Arduino Nano, 4 AA's, a capacitor and a resistor and voila. Turns out you could see them from the street quite well.


The capacitor and resistor were added per Adafruit's Best Practices page for Neopixels.

Friday, August 26, 2016

Vintage Atari CX22 Trak-Ball with USB interface.

The trackball, or Trak-Ball as Atari dubbed it, was a fascinating controller to me in the arcades. There was a mystery at work under the controller panel transferring the rolling motion of the ball to the character on the screen. They were too expensive to own for my Atari computer, so I played Centipede (not very well) at the arcade. I didn't really understand how trackballs worked until college. That's when I found out the mouse was just an upside down trackball with the optical encoder wheels and all. I recently picked up an Atari CX22 Trak-Ball at a vintage gaming show and turned it into a USB device. I plan on taking it to work to control my Mac just for the sake of irony. In the meantime, it's great for a mean game of Missile Command on the emulator.

Thank-you Dan Kramer for designing this awesome piece of hardware!


Atari made a few Trak-Ball models: the CX22 (for the 2600 and 8-bits) in the classic brown and beige colors, the CX80 with the mid-80's XL motif, and the CX53 for the 5200. The original CX22 only worked as a joystick simulator and a revision included a selector switch to allow true trackball control. This true trackball mode can be used to play Missile Command on the 8-bit computers by pressing control-T. Totally different and much closer to the arcade experience than the joystick. I put some links to trackball history and documentation at the bottom of this post - make sure you check out the concept drawings at the online Atari museum in the last link.

Decoding the Trak-Ball

The CX22 service manual gives a nice theory of operation for the trackball. The ball spins two rollers which rotate optical encoder wheels in each axis. The encoders have two signals in quadrature phase (like a sine and a cosine waves) used to determine the speed and direction. The direction is determine by finding which signal leads the other. To have a joystick mode, the CX22 does this with discrete CMOS logic chips. The quadrature square waves are fed to a CD4013B D-type Flip Flop - one signal acts as clock and the other data. When the data lags the clock, a logic 1 is latched in at the falling clock edge. When the data leads, the result is logic 0. In trackball mode, the clock and direction out are selected by the switch and sent to the controller port. In joystick mode, the clock triggers a one-shot 4538B chip configured for a 9-ms pulse width. The one-shot output gates the direction signal sent to the output. Thus, there's at least one 9-ms joystick direction pulse that is extended for each encoder wheel clock tick occurring before the 9-ms is up.

USB Device

Using the HID-Project library for the Arduino, I configured my Leonardo board to act like a USB mouse. The code is incredibly simple because the direction decoding is already performed by the CX22 hardware. (The Arduino could certainly decode the signals if the clocks were sent directly - here's a tutorial with multiple software approaches to quadrature decoding. Good to keep in your back pocket for building a spinner controller.) The code polls the clock signals and sends incremental mouse movements over USB to the OS. It also polls the digital input for the fire button(s) and sends mouse clicks. For some visual feedback, I blink the on board LED every time motion is detected. 
Here's my sketch:

#include <HID-Project.h>
#include <HID-Settings.h>

const int XINC = 6;
const int YINC = 6;

int xdir = LOW;
int xmot = LOW;
int ydir = LOW;
int ymot = LOW;

void setup() {
  // put your setup code here, to run once:
  for (int i=0; i<6; i++) {
  pinMode(i,INPUT_PULLUP);
  }
  pinMode(13,OUTPUT);
  Mouse.begin();
}

void loop() {
// poll the xmot and ymot looking for state changes
// when state change, increment mouse movement


int xold=xmot;
int yold=ymot;

ydir=digitalRead(0)*2-1;
ymot=digitalRead(1);
xdir=digitalRead(2)*2-1;
xmot=digitalRead(3);

if (xmot!=xold) {
  Mouse.move(xdir*XINC,0);
  digitalWrite(13,1);
}

if (ymot!=yold) {
  Mouse.move(0,ydir*YINC);
  digitalWrite(13,1);
}

int f=!digitalRead(4);
if (f) {
  Mouse.press();
  digitalWrite(13,1);
} else {
  Mouse.release();
  digitalWrite(13,0);
}

//Serial.println(x);
}

Thanks for stopping by!

Trackball Links