Showing posts with label 3D printing. Show all posts

Sunday, October 29, 2023

Atari 400

 My very own first computer was an Atari 400 bought second hand by my Dad. My friend Simon was moving back home to Ireland so wouldn't be able use an NTSC machine. It came with a 410 tape drive, some cassettes (most of which I could never get to load), and some carts. Because the 400 hooked up to a TV, Atari engineers had to design a Faraday cage for the main board to pass FCC electromagnetic interference (EMI) requirements. This resulted in the machine needing a door to fit over the cartridge slot.

I recently bought a 400 off of eBay and unfortunately the shipper did not do a good job packing. The power supply rumbled around and beat up the case. I got half off - I figure I can fix it. The machine was missing one of the hinge brackets and the cover got loose and the other hinge bracket came up. I was able to recover the bracket, its screw, and the torsion spring. I ended up taking the whole machine apart so I could fix the case and clean it up. The money I got back from the damage claim was enough to buy a 48k RAM upgrade. So hey, I will come of the deal OK.

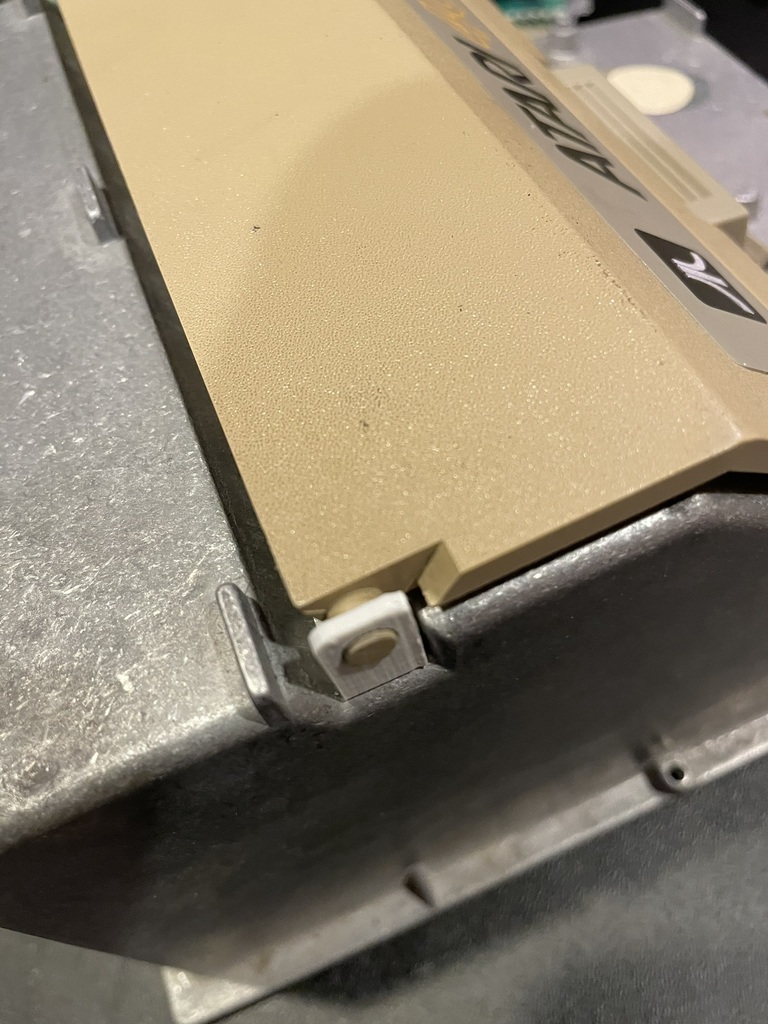
To replace the missing hinge bracket, I drew one up on Fusion 360 and printed it out. It fits quite nicely. The design is on Thingiverse

Replacement hinge bracket from the Atari 400 cart door.


Sunday, December 24, 2017

Dollhouse from Recycled CD Cases

The wife saw this neat design on Thingiverse and wanted to make one for the little bit. I printed a joint in PLA and tried it out. While I'm sure it works just fine, I thought it was a tad delicate for the hands of a toddler. One of the several designers to remix it added a small angle to the ends of the legs for grip. I thought that feature plus thickening up the whole thing would make a sturdy design. Here's my remix on Thingiverse.

While examining the CD case, I found the case itself has a little trim feature along the corners. I ended up drawing a profile that included this feature in Fusion 360. A straight piece I test printed went on a CD case with a satisfying snap. All the joints are extrusions of this profile.

I realized during assembly that the joints need cutouts where the trim pieces interfere with the extruded profile. Nonetheless, I was able to get the whole house assembled only needing to reprint 1 piece. However, there are one or two that might be a little stressed because of the force required to insert the CD's. If I where to build another of these, I would model the CD case in Fusion 360 and remove interfering material. I think that would make the whole thing easier to assemble.

I printed it in Taulman Bridge nylon, which is stronger but more flexible than PLA. (I learned about nylon filament during the boy's science fair project, but that is a different story.) Everyone is happy with the final result.


Sunday, June 4, 2017

Mars, Middle School, and 3D Models

"Dad, can you print out a 3D model of NE Syrtis Major?"
"Where's that?"
"On Mars. NASA might land the next rover there. Can't you just find a model and print it? I need it for science tomorrow. We're doing group projects."

A quick check on Thingiverse revealed no such model - not surprising. This presents quite the dilemma: Let the boy learn a lesson not to procrastinate or work on a really cool 3D printing project? The project was too cool to pass up but I have a tiny bit of guilt enabling the boy's poor planning.

Two problems to tackle first. Where is Syrtis Major and where do I get elevation data? The latter turns out to be really easy. I remember when NASA mapped Mars with a laser altimeter. A little googling and I find a digital elevation model downloadable as a TIFF file. Next problem is locating Syrtis Major. Some more googling and I download a nice paper with an image and latitude/longitude values. The candidate landing site in NE Srytis is topographically boring (i.e., flat) for obvious reasons. But the whole Srytis Major province is perched 3 miles above Isidis Planitia and a 2000-mile diagonal map is dramatic. That's what we'll target. 

I wrote a Matlab script (see below) to read in the TIFF file, subset out the area, smooth and decimate the surface down to something manageable. Someone wrote a nice mesh to STL exporter. My first crack at it would take 32 hours to print and since this is a fire fighting exercise, I smoothed it down even more and made the model only 6" on a side to get a 14 hour predicted print time. Right about when the school bus comes. The horizontal scale is 16,000,000:1 and the vertical is 220,000:1, which is about a 70x exaggeration in the elevation.

In my experience, many 3D models have errors so they are not manifold. Windows 10 has a built in app called 3D Builder that is great at correcting errors. I usually run my STL files through it before trying to slice them for printing. Here's a rendering of the model in 3D Builder:
The STL file is up on Thingiverse. I sliced it with the 0.2-mm normal setting in Prusa 3D Sli3er, loaded to my Octoprint server and started the job. Here's the outcome. Not bad!


Matlab script to generate the source STL file:

%%
a=imread('Mars_MGS_MOLA_DEM_mosaic_global_463m.tiff');;
%% maps
% https://astrogeology.usgs.gov/search/details/Mars/GlobalSurveyor/MOLA/Mars_MGS_MOLA_DEM_mosaic_global_463m/cub
% Minimum Latitude -90
% Maximum Latitude 90
% Minimum Longitude -180
% Maximum Longitude 180
% Direct Spatial Reference Method Raster
% Object Type Pixel
% Lines (pixels) 23040
% Samples (pixels) 46080
% Bit Type 16
% Radius A 3396000
% Radius C 3396000
% Bands 1
% Pixel Resolution (meters/pixel) 463.0836
% Scale (pixels/degree) 128
% Horizontal Coordinate System Units Meters
% Map Projection Name Simple Cylindrical
% Latitude Type Planetocentric
% Longitude Direction Positive East
% Longitude Domain -180 to 180
imshow(a(1:100:end,1:100:end))
%% subset
% http://onlinelibrary.wiley.com/doi/10.1029/2003JE002143/abstract
% http://www.planetary.brown.edu/pdfs/2763.pdf
% Figure 1: The map covers an area from -10S to 30N and from 270W to 315W.
% 270 W is -90 E and 315 W is -45 E
lat=linspace(-90,90,size(a,1));
lon=linspace(-180,180,size(a,2));
x=interp1(lat,1:size(a,1),-[30 -10],'nearest');
y=interp1(lon,1:size(a,2),-[-45 -90],'nearest');
b=a(x(1):x(2),y(1):y(2));
%%
figure
N=5;
pcolor(flipud(b(1:N:end,1:N:end)))
shading flat
%% smooth
S=25;
c = double(imgaussfilt(b,S));
%% plot
figure
N=2*S;
mesh((c(1:N:end,1:N:end)))
shading flat
%% make surface to export
N=2*S;
d=c(1:N:end,1:N:end);
d=d-min(d(:));
d(d<0)=0;
d(1:end,1)=0;
d(1:end,end)=0;
d(1,1:end)=0;
d(end,1:end)=0;
d=d*35/max(d(:));
[u,v]=meshgrid(1:size(d,2),1:size(d,1));
u=u*150/max(u(:));
v=v*150/max(v(:));
%%
mesh(u,v,d); axis equal
%%  export
% https://www.mathworks.com/matlabcentral/fileexchange/20922-stlwrite-filename--varargin-
stlwrite('mars4.stl',u,v,d)

Friday, December 23, 2016

3D Christmas 2016 - The Print

The model described in my last post was printed and nickel plated by my friend who suggested the idea for the ornament. He also asked me to put a 3/4" hole in the bottom - this makes it possible to rest the ornament on a tree branch with a tree light poking inside. Here's the final outcome:
Merry Christmas from our house to your's!

Sunday, December 11, 2016

3D Christmas 2016 - The Model

This year's Christmas ornament is a 3D model of our house. My 3D-printing friend at church suggested the idea and offered to print and plate it. That's cool. In this post I describe creating this 3D model in SketchUp. I put up an OBJ file over at Thingiverse.

I've used SketchUp occasionally for several years and decided to start there because it's easy to enter accurate dimensions. I stumbled upon the match photo feature, which is exactly what I needed but didn't know it. This feature allowed me to import photos of my house and match the coordinate system to the picture by determining the origin, rotation, scale, and perspective. I followed the directions here. Then I traced the outline with the line tool starting with major lines on the principal axes. I drew some construction lines to allow me to locate the apex and trace the A-frame of the roof. I simplified the overhang because the print will be quite small. I'm not going for accurate construction drawings here, just something that looks nice and representative. This picture shows my starting photo with the nearly finished model:
I used the long gutter and siding seams to align the vanishing point lines, which set the coordinate system perspective and rotation. The origin is moved to the far corner of the garage because it seemed easy to put there. Once the model is started, more photos of the other corners are brought in. For each photo, I set the vanishing lines, origin, and then the scale to visually match up the existing model with the photo as best I can. Here's the other front corner:
I drew the chimney after completing all four sides of the house. The windows and doors are last. Since it's not possible to print detailed lattices in the windows because they are too small, I was advised to put in what I could with about an 0.8mm thickness. The windows are recessed and the shutters are extruded out. I did end up putting the panel details on the garage doors. I don't include any of the utility features, for example the power meter or chimney cover used for keeping the critters out. 

Finally, I usually use Solid Inspector in SketchUp to fix it, but always have to run my models through this cloud repair tool. I stumbled upon Windows 10's new 3D Builder - it did a great job of making the model manifold. 

Sunday, March 27, 2016

Easter 3D Print (and Splitting a 3D Model in Half)

Holidays are a good excuse to find something whimsical to 3D print. I found this pair of egg legs over on Thingiverse and chuckled. The legs are pose-able and hold an egg. Wife sketched an Humpty Dumpty on an egg and suggested I shoot the model in the garden. He can stand (above) or sit (below).

When I loaded up the model, I discovered the pieces would be difficult to print. Turns out the original designer is a grad student at MIT Media Lab and has access to a fancy industrial grade fabricator. On hobby printers, 3D objects are easiest to print when they have one flat face to serve as a base. For example, pyramids are easy to print and good for testing a printer setup. Otherwise, when an object has a part that hangs in mid air, the printing software can insert extra material for support. Sometimes though, some objects are just unprintable.

This model has 5 pieces: feet, lower legs, left & right upper legs, and a torso. The feet were easy. The lower legs printed OK with support. I rotated the upper legs 90 degrees and printed them with support. The "egg holding torso" print, however, failed miserably. To solve the problem, I was able to make my own flat face on the object by slicing it in half, printing the two halves, and super-gluing them together.

Surprisingly, there are few solutions for cutting 3D model objects in half to be googled-up. I ended up using Meshmixer, with which I've had varying success in the past. This time, however, it worked perfectly. Import the STL file and select "plane cut" under the "edit" menu. The default plane was oriented exactly along the major axes, splitting the part in half easily.
Print two, glue, build, pose, photograph, write a blog post. Happy Easter.

Saturday, January 16, 2016

(Too) Many Projects

I have (too) many projects started and not finished. There’s the Nerf blaster mod the boy and I started - it’s getting there. I was testing some stepper motors from an old Epson printer with drivers and an Arduino. I was reminded once again to be careful when using 12 volts around a digital circuits. I’ve got a side project going for measuring static air pressure in a tube with a display for a friend. And I wrote up some simple text-based games on the girl’s TI-84 Plus CSE graphing calculator - my favorite is a Space Invaders rip off. And I started working on a vertical scroller Atari BASIC game.  All of this was before Christmas. At Christmas we got a family present of a LittleBits Cloudbit Starter Kit. That has some cool integration you can do with Minecraft. Last weekend I finally powered up an FPGA-Arduino board I got myself for my birthday right before #3 was born. I’m hoping to use it for video game emulation. Finally, the boy has broken out the Lego Mindstorms and built the R2-D2 look alike after seeing Star Wars. Now, if I can just get him to program it.

Definitely … technically … distracted.

Stepper motors

My kids were playing “Cookie Clickers” on their iPods. You know, that silly game where you click, click, and click to get cookies. Fortunately, the addiction is short lived. The game is actually an object lesson in labor and investment. Early on, you have to click to get points. Once you get enough points, you can start to buy automatic clickers. At some point, through enough investment, you don’t even bother to click. Your score grows exponentially. I look at this and think, “ah! automation!” You don’t want to dig ditches? Then go get an engineering degree, design a digger, and hire someone to drive it. Hopefully you’ve created more jobs in the process. But, I digress.

I had this idea I was going to build a laser engraver - it could happen. Along that path I got some small steppers out of an old printer and bought a CNC shield and stepper drivers for an Arduino. There’s a G-code interpreter for this unit so you can drive the motors using standard a development chain (e.g., SVG to STL to Gcode). I cobbled together a cheap (free) x-y table and tried it out - turns out the motors weren’t strong enough. I should have realized it wouldn’t work so well given the steppers were about ⅓ the size of those on my 3d printer. So here’s where I detoured. Automate the cookie clicker.

I designed and printed my own NEMA-17 bracket and a holder for a stylus. Instead of using the G-code software, I wrote my own pulse generator to trigger the driver. That and some finagling with the iPod orientation and I could click much faster than my kids. They were actually impressed with this one! Turns out the faster you click, the more bonus you get. My kids could only get +3 and my contraption got +5. They’d never seen that. So here I thought I’m on my way to unlimited wealth. Alas, periodically they game opens a pop-up offer you purchases. Oh well, it was fun, I learned to use the stepper drivers, and most importantly I had a good laugh with the kids.


This is long enough … I’ll do TI Atari 10-line BASIC games next time.


Monday, December 21, 2015

3D Christmas

Growing up we had dated Christmas ornaments on the tree for a number of years. They were silver or crystal. I think one was cross-stitched. I thought it would be good to restart that tradition in my own family - we have a couple dated ones already. So this year, I made a Christmas 2015 3D-printed wreath ornament. This is the second 3D-printed ornament on our tree.
Last year, the White House sponsored a 3D ornament contest. The contest rules required the entry to be put up on Instructables - here’s our’s. The wife and I designed the ubiquitous red ball, but embossed the first stanza of The First Snowfall by American poet James Russel Lowell into the surface:

The snow had begun in the gloaming,
   And busily all the night
Had been heaping field and highway
   With a silence deep and white.

We didn’t win. Although there was no contest this year, I went ahead and made one for ourselves.


The design is pretty much monolithic and made of three colors dictated by my stock of filament. Because my simple printer only has one print head, I had to make three jobs of it and glue the results together. I’m a bit enamored with extruded text like Robert Indiana’s LOVE sculpture. I used Inkscape to create an SVG file of the text and extruded it in Autodesk 123D. One thing I learned was I liked the text sized larger when it came to printing and building the model vs. the size it looked on the screen. Maybe it's "the camera adds 10 pounds" phenomenon. I printed the characters 30% larger than I designed them.

Not sure what will be next year’s creation. Probably something smaller so it doesn't crowd out the other ornaments we’ve collected over the years.


Saturday, November 7, 2015

Destiny Ghost - 3D Print for Halloween Costume

The boy really really likes to play Destiny. So for Halloween, it was an obvious costume choice. The only real important thing to him was the Ghost - an electronic companion that floats by your side in the game. Thinking I might draw one up in SketchUp to print, I started looking at images. But, then I found a really nice design at Thingiverse and ended up printing it instead.

Searching images for Destiny cosplay yields several characters with Ghosts. Most of them are holding the little light in their hand, but some had it hanging above their shoulder. To hang our Ghost, I designed a hanger insert and glued it between the Ghost halves during assembly. Wife made a cross-body harness to hold the boom for suspending the piece above the boy’s shoulder. It worked pretty well.


Clogged Printer Nozzle

Halfway through printing the second half, the printhead clogged. I learned to change out the nozzle. At first, I thought I could just melt it out at 250-C, but that didn’t clear the plug. I tried a couple other techniques I found online to no avail. I broke down and ordered a new nozzle. After clearing the stuck filament, replacing the nozzle, and hacking the G-Code, I was able to finish the print in progress. It was already 5 hours in and I didn’t want to have to start over. The piece has a little dislocation because I didn’t get the restart layer exactly right, but it’s acceptable. 

I had to recalibrate the printer before printing anything else. It took a while to figure out how to make the prints stick with the new head - I think because it’s an aftermarket part and is a different shape from the original. I suspect it transfers heat away from the filament because the tip has a large cross section. To get the first layer to stick to the blue tape, I have to really get a good squish. For more testing, I printed my go-to calibration cube and saw that bridges were sagging. Lowering the temperature 5 degrees helped (maybe the different nozzle shape blocks the cooling fan airflow), but then the prints had trouble sticking on the first layer. I discovered in Slic3r, there’s an option to print the first layer at a different temperature - bumping it up 5 degrees solved my problem. Now I’m back in business.