The boy really really likes to play Destiny. So for Halloween, it was an obvious costume choice. The only real important thing to him was the Ghost - an electronic companion that floats by your side in the game. Thinking I might draw one up in SketchUp to print, I started looking at images. But, then I found a really nice design at Thingiverse and ended up printing it instead.
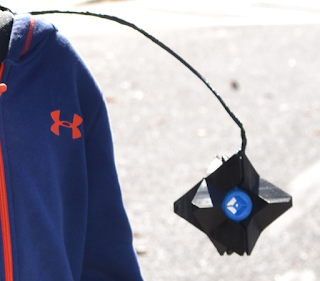
Searching images for Destiny cosplay yields several characters with Ghosts. Most of them are holding the little light in their hand, but some had it hanging above their shoulder. To hang our Ghost, I designed a hanger insert and glued it between the Ghost halves during assembly. Wife made a cross-body harness to hold the boom for suspending the piece above the boy’s shoulder. It worked pretty well.
I had to recalibrate the printer before printing anything else. It took a while to figure out how to make the prints stick with the new head - I think because it’s an aftermarket part and is a different shape from the original. I suspect it transfers heat away from the filament because the tip has a large cross section. To get the first layer to stick to the blue tape, I have to really get a good squish. For more testing, I printed my go-to calibration cube and saw that bridges were sagging. Lowering the temperature 5 degrees helped (maybe the different nozzle shape blocks the cooling fan airflow), but then the prints had trouble sticking on the first layer. I discovered in Slic3r, there’s an option to print the first layer at a different temperature - bumping it up 5 degrees solved my problem. Now I’m back in business.
Searching images for Destiny cosplay yields several characters with Ghosts. Most of them are holding the little light in their hand, but some had it hanging above their shoulder. To hang our Ghost, I designed a hanger insert and glued it between the Ghost halves during assembly. Wife made a cross-body harness to hold the boom for suspending the piece above the boy’s shoulder. It worked pretty well.

Clogged Printer Nozzle
Halfway through printing the second half, the printhead clogged. I learned to change out the nozzle. At first, I thought I could just melt it out at 250-C, but that didn’t clear the plug. I tried a couple other techniques I found online to no avail. I broke down and ordered a new nozzle. After clearing the stuck filament, replacing the nozzle, and hacking the G-Code, I was able to finish the print in progress. It was already 5 hours in and I didn’t want to have to start over. The piece has a little dislocation because I didn’t get the restart layer exactly right, but it’s acceptable.I had to recalibrate the printer before printing anything else. It took a while to figure out how to make the prints stick with the new head - I think because it’s an aftermarket part and is a different shape from the original. I suspect it transfers heat away from the filament because the tip has a large cross section. To get the first layer to stick to the blue tape, I have to really get a good squish. For more testing, I printed my go-to calibration cube and saw that bridges were sagging. Lowering the temperature 5 degrees helped (maybe the different nozzle shape blocks the cooling fan airflow), but then the prints had trouble sticking on the first layer. I discovered in Slic3r, there’s an option to print the first layer at a different temperature - bumping it up 5 degrees solved my problem. Now I’m back in business.
No comments:
Post a Comment